Monday, 12 August 2013

Update: The roof

As its been 6 months since my last post, I thought I'd treat you to 2 in one day!

Just thought I'd do a little update on the house...

I've now emptied anything that moves from inside the house. There are still a few pictures up and lights etc where the wires are behind wallpaper or underneath carpet... a job for another day. 


Today I've taken off the front of the card roof tiles. Still needs some cleaning before I can apply the new ones. Lots of glue still sticking on! I'm also looking into getting some pitched roof dormer windows for the loft room with some nice wooden windows. 

I might go and tempt myself to dolls house stuff online now... 

Bricking it: Part 3. A bit belated...

Oh my god, I haven't posted here for 6 months! And I never posted part 3 of bricking up my house.
Sorry I've been so...not here. In the last 6 months, I've moved house - again. We're now in our own lovely 200 year old cottage in the old part of town, which is beautiful for a nice walk and we often go and sit in the park across the road for a Sunday picnic!
I've also got myself an internship to carry out while I'm on Summer holidays from my school job which is going well, so I've been quite busy...!

Anyway, I've now applied the Realistic Brick Compound to the rest of the house, but I think it still needs tweaking and I may even need to wipe some parts off and do them again (I just hope I have enough compound left. I'll also need to bring the house downstairs to the dining room table..!)

This is the side and back of the house, mostly covered. You have to line up the bricks to make sure they look like they've been laid on a corner, but that's pretty easy to do. As my house is already built, it was a bit more fiddly to get right to the top or bottom instead of being able to lay the separate pieces on a flat surface and cover them like that. 


This is an example of one of the 'seams' that appeared as I was covering my house. The instructions say that you don't have to let the compound dry before laying the stencil on top and covering the next part of the house. However, when I did this, the compound kind of stuck to itself and gave me these pronounced seams. I think it should be ok to fix... just needs a sand down I should imagine. 

This was the other problem I encountered, which may be more difficult to fix. Combining the compound and the spray mount, both on the stencil, the compound ended up sticking to the mount on the stencil which diminished the size of the individual bricks. That meant that while I started (with a clean stencil) with evenly sized bricks, with use, the bricks became clogged up with the sticky compound which then made the spaces between the bricks thicker...giving a slightly uneven look to the brick work.

I'm hoping that with a good clean of the stencil (even though it was cleaned throughout stencilling) and a re-applying of some of the bricks, that it might solve the problem... We shall see. 

After that's done, I'll be adding weathered effects to the bricks - more research to be done on that first though. Then I can varnish! 

Monday, 18 February 2013

Bricking it: Part 2.

I have a week off work this week so I wanted to get on with some of my house. Although, the boy is ill in bed so I'm also looking after him! However, while he was asleep this afternoon, I snuck away to do some work.

I started applying my Realistic Brick Compound to the chimneys of the house as I wanted to start somewhere small and fairly inconspicuous just incase it went wrong and I had to wipe it all off...


This was what I started with; some repositionable spray mount, my brick compound, my brick stencil and a few tools like a mug and a knife.

The spray mount was Elmer's Repositionable Mounting Spray...and was quite hard to work with. It seemed to take a few sprays until the stencil would become sticky enough to stick first time and I think it stuck to me more than it stuck to the wood! 
I'm hoping it was partly due to the fact that the paint on the chimneys seemed not to have taken as well as to the rest of the house, so maybe it'll stick better when I brick the other walls! But I still have sticky fingers...which are now fluffy from washing and drying them! 


The brick compound looks like this; you add water to it to make into a paste, much the texture of wet sand. Smooth but spreadable and not runny. You barely needed any water for this mix. For maybe 2 teaspoons of powder you only need a few drops of water. It's very forgiving as well because you can add more water or more powder to get the consistency right and it stays wet for ages, but if it does start drying out, you can add a few more drops of water to bring it back to life. 

So the first step of stencilling was to spray the stencil (outside), wait 30 seconds or so, then stick the stencil onto the house, lining everything up - which takes a while! - and making sure all parts of the stencil are stuck down so the compound doesn't bleed underneath! As I said, this took a while as, even though I only sprayed one side of the stencil, it seemed to make both sides very sticky and then had a habit of sticking to me more than the house! At one point, I thought I might lose a layer of skin I was stuck so much!


Next, I spread some of the compound mixture over the stencil with a knife, making sure everything was covered and then smoothed it over. 

Peel the stencil away...


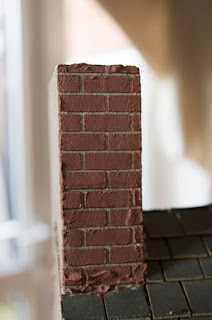
And you have bricks! 
This was the first part I did and I think they look Victorian/Edwardian already!
The effect is really good and I'm sure it'll look even more impressive once it's all covered; I only did the chimneys today and it took me an hour and a half to do that! It's a very fiddly task; the lining up of the stencil round corners etc. and getting the stencil to stick where you want it to takes time, but hopefully the next part will be easier as it'll be a wider, flatter surface and I can stencil large parts at a time.

That'll hopefully be tomorrow or the next day, before I travel down South to see the family, so hopefully I'll update soon! 


Thursday, 3 January 2013

Painting the Exterior

So, the Christmas madness has died down a little - more's the pity! But I'm still on my Christmas holidays so what better time to do a bit of renovation?

Now I have a few days to myself, since the boyfriend is back at work, I thought I'd get going on the painting of my house. 
I chose a Dulux standard emulsion colour tester pot in Muddy Puddle - £1 each from Wilkinson's! I bought 2 which was just enough for the whole outside of the house and the inside of the front facia. 

This is what the house looked like beforehand - I'd picked off as much of the old glue around the windows and doors as I could and sanded everything back to get a smoother starting point. 

 I also unscrewed the transformer from the back of the house and took the old copper conducting wire off the back. It was really easy to get off as it was just sticky-backed, so peeled off easily. 


The tester pots of paint came with a brush attached to the lid. It wasn't the best or smoothest of brushes, but it did the job and I figured that as the paint is meant to be cement, it didn't have to look pristine. 

So this the front of the house painted and dried. The colour did dry quite a lot lighter than when it was wet, but it pretty much matched the colour on the front of the pot so I'm sure it'll look good as cement. 
The house already looks much better than it did before and now I can't wait to get the bricks on it! Still need some spray mount first!