Tuesday, 6 January 2015

Miniature Christmas Presents!

I have to admit, I haven't done much to the house since my last post. But, in my defence, life has become rather busy! I have changed jobs since my last update! I am now a Junior Photographer for the UK's largest jewellery retailer. I'm so happy to finally be working in the photography industry! I graduated 4 years ago, so to finally be doing something that I spent 3 years getting a degree in; I finally have the job I wanted! So, in accordance with having a 'proper' job, I now work proper hours! 9-5:30, no school holidays… I thought I'd miss them but I'm enjoying the job so much, I don't miss them at all! And now I have a car, I can pop down and visit home at the weekend if I feel like it!

I had a couple of weeks off over Christmas and kept thinking I would do some stuff to the house but then realised I can't really do much more until I decide what I'm doing with the lighting and electric; if I'm wiring lights in, I need to do it before wallpapering…

Anyway, enough rambling, more about the house. As you may have noticed, it was Christmas recently - not sure how that came around so quickly, then passed by so quickly!
I received a few mini presents for the house too.

Firstly, a hand-made rug. This was made by my Gran who does a lot of tapestry work. I had mentioned the colour scheme of the study I'm planning. I have some green wallpaper I want to use in there and want the feel of it to be very warm and cosy with warm lights (maybe candles - fake ones obviously) and a small writing desk with maps and paintings on the walls. Maybe I could fit a fireplace in there too… I think this rug will fit in great with the planned study!

Secondly, also from my Gran, I got a Tiffany style table lamp! I was very happy about this as I wanted a Tiffany lamp for my house. I love the style and the period is right too! I think this will probably go in the living room once the house is complete. This lamp is battery operated, so you just flick a switch (which you can hide at the back of the lamp) and once the battery runs out, it can be replaced so, very handy and much easier than wires all round the house.

In my stocking, I got two little gifts that will fit well in the kitchen; a modelling clay carrot cake, complete with icing and sugar paste carrots on top! To be honest though, I think I'll have to change the 'plate' the cake is on. I'm not sure they had holographic paper plates in 1910!

I also received this little mouse in a block of cheese! Not sure how big this cheese - or the mouse!! - is for a 1:12 scale house! I will have to see once it comes times to accessorise. 

So, these little things have spurred me on to actually make a decision about the lighting. I will be looking into prices and practicalities of the options soon then, hopefully, I can get going with the next bit!

Bye for now and happy New Year! 

Friday, 25 April 2014

Stripping!

I had the urge to do some DIY today so I sat in front of my house and started stripping wallpaper and flooring paper off in the attic.

This is what it looked like before. You can see the dark, mouldy patch where, somewhere along the line, we'd had a leak. It generally looked a bit dishevelled.


This was the stair case, minus the stair carpet that had been there, and the remnants of the old glue that stuck it down.


I managed to lift the staircase up quite easily by wedging a screw driver in the side and lifting it up. I was almost tempted to leave it and have it as a futuristic moveable staircase!! But, no...

This is the flooring that's going in. I think this'll probably go in every room apart from the kitchen where I'll have tiles. It's a cherry wood sticky flooring in strips that (I think) peel off a backing sheet and can be trimmed to size. There'll be more on this when it actually goes in!

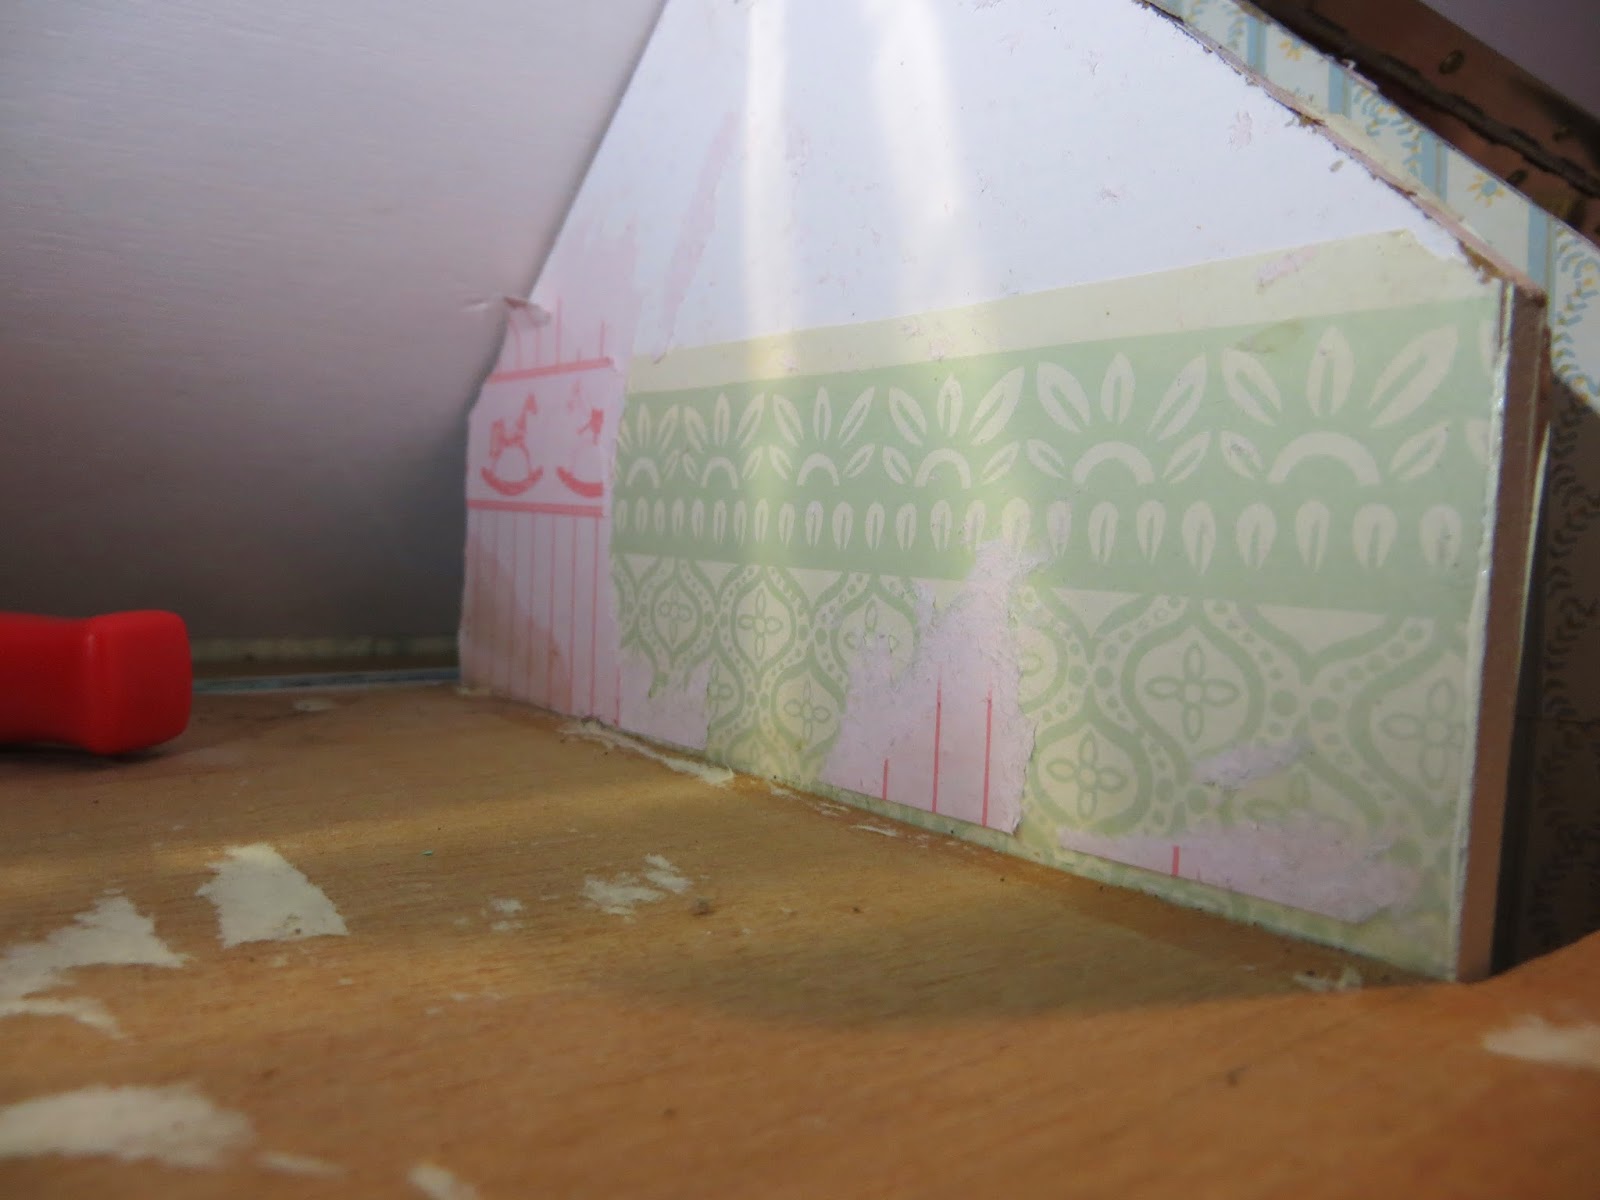
Part way through the stripping process (below.) I'd planned on just doing the floor but the edge of the flooring paper was tucked under the bottom of the wallpaper where the wall and floor join. 


 I uncovered all the old wiring which was obviously copper and, over the years, had gone green. A lot of it was also pretty stuck down to the floor boarding and extraction may have to be finished another day!

I found this under some parts of the pink wallpaper - mainly on the middle section of the dividing wall. It's a green patterned wallpaper which looks like it only covered the bottom half of the wall and had white paint on the top half. It's as if my Granddad or Mum had started decorating like this then changed their minds and covered it all in pink wallpaper! Maybe mother could shed some light..?

So far, I've taken up almost all the flooring paper on both sides of the loft room and taken down 70% of the wallpaper. The wiring is going to take a lot of time I feel, as there are a lot of crossing over sections (as in the image below) and each joining part had a little metal peg in it (there were a few in the wall under the lights) which need to be pulled out with pliers. But at that point, I'd had no dinner and so left it for another day/time when I have more strength!

I think I'm going to get a little pot of white or off-white paint to repaint the ceiling and maybe inside the dormer windows and then I get to lay the flooring down!

Wednesday, 16 April 2014

Finishing the Exterior.

I've been meaning to finish the exterior of my house for a while now so I made myself get off the sofa today (it is the Easter holidays after all!), brought the house down to the kitchen table and got going!

I'd already painted the house and covered it in the brick compound from Bromley Craft Products. (Blog post Here.)
But the compound had dried with seams and varying gaps between the bricks! (This was due to the stencil getting clogged up with the re-positionable spray mount… annoying.)
So today I went over a few bits with the left over brick compound to fill in some of the gaps and also finished off some of the trickier bits without the stencil - using a trusty cocktail stick instead to create the outlines of the bricks to show the mortar beneath.

Next job was painting! I think I'd been putting this off as I was a bit apprehensive to start and get it wrong - then the paint's stuck there forever! So, I started on a fairly inconspicuous bit: the corner of the back of the house. It was a bit dodgy, but I then did the chimneys which I was pleased with; making the bricks look sooty and old.
I used acrylic paints in green, brown, black, white and a bit of red and yellow to create effects such as soot, moss, dirt, paint and general wear and tear.

Then the boyfriend came home and took over! Being an artist, he couldn't help himself and he actually made it look a lot more realistic. So together, we brushed on some more 'moss' and made the bricks dirty using an almost dry brush and dry-ish paint so as not to spread it on too thickly. By almost stippling the paint, we created what looks like moss and by brushing over a colour the same as the brick compound (apparently, one of the boy's strengths is mixing paint to match a colour!), the bricks look more realistically dirty instead of just splodged with black paint.

We then sanded down some of the paint work to make it look more distressed and weather-worn - another of the boy's ideas which, again, worked really well!

Here's what the house looked like after the painting and sanding.

I love these bricks, here! They really look like moss and lichen!


To varnish, I used Windsor and Newton's All Purpose Matt Varnish bought from Bromley Craft Products. It HAS to be Matt… houses aren't shiny! This was just a little can and I pretty much used up the whole thing with a good first coat and a thinner second coat of the whole house. 


I'm really pleased with how the house looks now! As you can see, I've painted the sides of the roof black which I think looks more realistic and much more dramatic. You can see the moss stippling here and the sooty, dirty look of the bricks. 
It is recommended that you use acrylic paint as its thick and goes on well, its blendable and works with the brick compound too. However, I found that the paint does have to be thick to dry: not watered down much at all as the compound is very absorbent and if too thin, the paint will find its way across bricks and seep into all the little gaps! 

I'm so pleased I've finally finished the exterior of my house! I can now get going on the inside which is the fun(ner) bit! I shall be going upstairs just to admire my house periodically from now on :)

Friday, 21 February 2014

Dormer Windows!

A little update tonight. I got some dolls' house things for Christmas last year: a new stair case, a front door (both of which will be varnished at some point) and 2 dormer windows for the roof!


They have lollypop stick style roof tiles so I will be buying some similar for the rest of the roof. Speaking of the rest of the roof: My new dormer windows are much smaller than the old ones so I will also have to replace the roof with a new piece of ply-wood and get some holes cut in it the right size for the new dormer windows! 


This is what they looked like after being painted and bricked. 

A close up on the pointed roof bricking: This space was way too small to fit the stencil into to stick and plaster over with the compound so I had to just plaster some compound into the space and, with a cocktail stick, scraped out the spaces in-between for the base colour to show through. The resulting 'bricks' are possibly slightly bigger than the stencil bricks, but with the compound sticking to the stencil, all the bricks seem to be difference sizes anyway, haha! 

I'm looking forward to my new roof now! 

Monday, 12 August 2013

Update: The roof

As its been 6 months since my last post, I thought I'd treat you to 2 in one day!

Just thought I'd do a little update on the house...

I've now emptied anything that moves from inside the house. There are still a few pictures up and lights etc where the wires are behind wallpaper or underneath carpet... a job for another day. 


Today I've taken off the front of the card roof tiles. Still needs some cleaning before I can apply the new ones. Lots of glue still sticking on! I'm also looking into getting some pitched roof dormer windows for the loft room with some nice wooden windows. 

I might go and tempt myself to dolls house stuff online now... 

Bricking it: Part 3. A bit belated...

Oh my god, I haven't posted here for 6 months! And I never posted part 3 of bricking up my house.
Sorry I've been so...not here. In the last 6 months, I've moved house - again. We're now in our own lovely 200 year old cottage in the old part of town, which is beautiful for a nice walk and we often go and sit in the park across the road for a Sunday picnic!
I've also got myself an internship to carry out while I'm on Summer holidays from my school job which is going well, so I've been quite busy...!

Anyway, I've now applied the Realistic Brick Compound to the rest of the house, but I think it still needs tweaking and I may even need to wipe some parts off and do them again (I just hope I have enough compound left. I'll also need to bring the house downstairs to the dining room table..!)

This is the side and back of the house, mostly covered. You have to line up the bricks to make sure they look like they've been laid on a corner, but that's pretty easy to do. As my house is already built, it was a bit more fiddly to get right to the top or bottom instead of being able to lay the separate pieces on a flat surface and cover them like that. 


This is an example of one of the 'seams' that appeared as I was covering my house. The instructions say that you don't have to let the compound dry before laying the stencil on top and covering the next part of the house. However, when I did this, the compound kind of stuck to itself and gave me these pronounced seams. I think it should be ok to fix... just needs a sand down I should imagine. 

This was the other problem I encountered, which may be more difficult to fix. Combining the compound and the spray mount, both on the stencil, the compound ended up sticking to the mount on the stencil which diminished the size of the individual bricks. That meant that while I started (with a clean stencil) with evenly sized bricks, with use, the bricks became clogged up with the sticky compound which then made the spaces between the bricks thicker...giving a slightly uneven look to the brick work.

I'm hoping that with a good clean of the stencil (even though it was cleaned throughout stencilling) and a re-applying of some of the bricks, that it might solve the problem... We shall see. 

After that's done, I'll be adding weathered effects to the bricks - more research to be done on that first though. Then I can varnish! 

Monday, 18 February 2013

Bricking it: Part 2.

I have a week off work this week so I wanted to get on with some of my house. Although, the boy is ill in bed so I'm also looking after him! However, while he was asleep this afternoon, I snuck away to do some work.

I started applying my Realistic Brick Compound to the chimneys of the house as I wanted to start somewhere small and fairly inconspicuous just incase it went wrong and I had to wipe it all off...


This was what I started with; some repositionable spray mount, my brick compound, my brick stencil and a few tools like a mug and a knife.

The spray mount was Elmer's Repositionable Mounting Spray...and was quite hard to work with. It seemed to take a few sprays until the stencil would become sticky enough to stick first time and I think it stuck to me more than it stuck to the wood! 
I'm hoping it was partly due to the fact that the paint on the chimneys seemed not to have taken as well as to the rest of the house, so maybe it'll stick better when I brick the other walls! But I still have sticky fingers...which are now fluffy from washing and drying them! 


The brick compound looks like this; you add water to it to make into a paste, much the texture of wet sand. Smooth but spreadable and not runny. You barely needed any water for this mix. For maybe 2 teaspoons of powder you only need a few drops of water. It's very forgiving as well because you can add more water or more powder to get the consistency right and it stays wet for ages, but if it does start drying out, you can add a few more drops of water to bring it back to life. 

So the first step of stencilling was to spray the stencil (outside), wait 30 seconds or so, then stick the stencil onto the house, lining everything up - which takes a while! - and making sure all parts of the stencil are stuck down so the compound doesn't bleed underneath! As I said, this took a while as, even though I only sprayed one side of the stencil, it seemed to make both sides very sticky and then had a habit of sticking to me more than the house! At one point, I thought I might lose a layer of skin I was stuck so much!


Next, I spread some of the compound mixture over the stencil with a knife, making sure everything was covered and then smoothed it over. 

Peel the stencil away...


And you have bricks! 
This was the first part I did and I think they look Victorian/Edwardian already!
The effect is really good and I'm sure it'll look even more impressive once it's all covered; I only did the chimneys today and it took me an hour and a half to do that! It's a very fiddly task; the lining up of the stencil round corners etc. and getting the stencil to stick where you want it to takes time, but hopefully the next part will be easier as it'll be a wider, flatter surface and I can stencil large parts at a time.

That'll hopefully be tomorrow or the next day, before I travel down South to see the family, so hopefully I'll update soon!