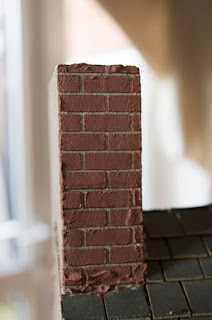
I started applying my Realistic Brick Compound to the chimneys of the house as I wanted to start somewhere small and fairly inconspicuous just incase it went wrong and I had to wipe it all off...
This was what I started with; some repositionable spray mount, my brick compound, my brick stencil and a few tools like a mug and a knife.
The spray mount was Elmer's Repositionable Mounting Spray...and was quite hard to work with. It seemed to take a few sprays until the stencil would become sticky enough to stick first time and I think it stuck to me more than it stuck to the wood!
I'm hoping it was partly due to the fact that the paint on the chimneys seemed not to have taken as well as to the rest of the house, so maybe it'll stick better when I brick the other walls! But I still have sticky fingers...which are now fluffy from washing and drying them!
The brick compound looks like this; you add water to it to make into a paste, much the texture of wet sand. Smooth but spreadable and not runny. You barely needed any water for this mix. For maybe 2 teaspoons of powder you only need a few drops of water. It's very forgiving as well because you can add more water or more powder to get the consistency right and it stays wet for ages, but if it does start drying out, you can add a few more drops of water to bring it back to life.
So the first step of stencilling was to spray the stencil (outside), wait 30 seconds or so, then stick the stencil onto the house, lining everything up - which takes a while! - and making sure all parts of the stencil are stuck down so the compound doesn't bleed underneath! As I said, this took a while as, even though I only sprayed one side of the stencil, it seemed to make both sides very sticky and then had a habit of sticking to me more than the house! At one point, I thought I might lose a layer of skin I was stuck so much!
Next, I spread some of the compound mixture over the stencil with a knife, making sure everything was covered and then smoothed it over.
Peel the stencil away...
And you have bricks!
This was the first part I did and I think they look Victorian/Edwardian already!
The effect is really good and I'm sure it'll look even more impressive once it's all covered; I only did the chimneys today and it took me an hour and a half to do that! It's a very fiddly task; the lining up of the stencil round corners etc. and getting the stencil to stick where you want it to takes time, but hopefully the next part will be easier as it'll be a wider, flatter surface and I can stencil large parts at a time.
That'll hopefully be tomorrow or the next day, before I travel down South to see the family, so hopefully I'll update soon!


No comments:
Post a Comment